Rage Cube 3 guide: tile types, block-rolling logic and the first 20 levels
✍️ Güncel Oyun Oyna Team 📅 ⏱ 7 min read
In Rage Cube 3 you tip a red 1×1×2 block over tile platforms and finally drop it upright into the exit hole. The early levels are easy, but as new tile types appear, anyone who can't predict how the block will land meets a puzzle that earns its name. This guide doesn't hand you solutions. It explains how the block moves, exactly what each tile does and what each of the first 20 levels is trying to teach, so you can crack every level yourself. Open Rage Cube 3 and try things out as you read.
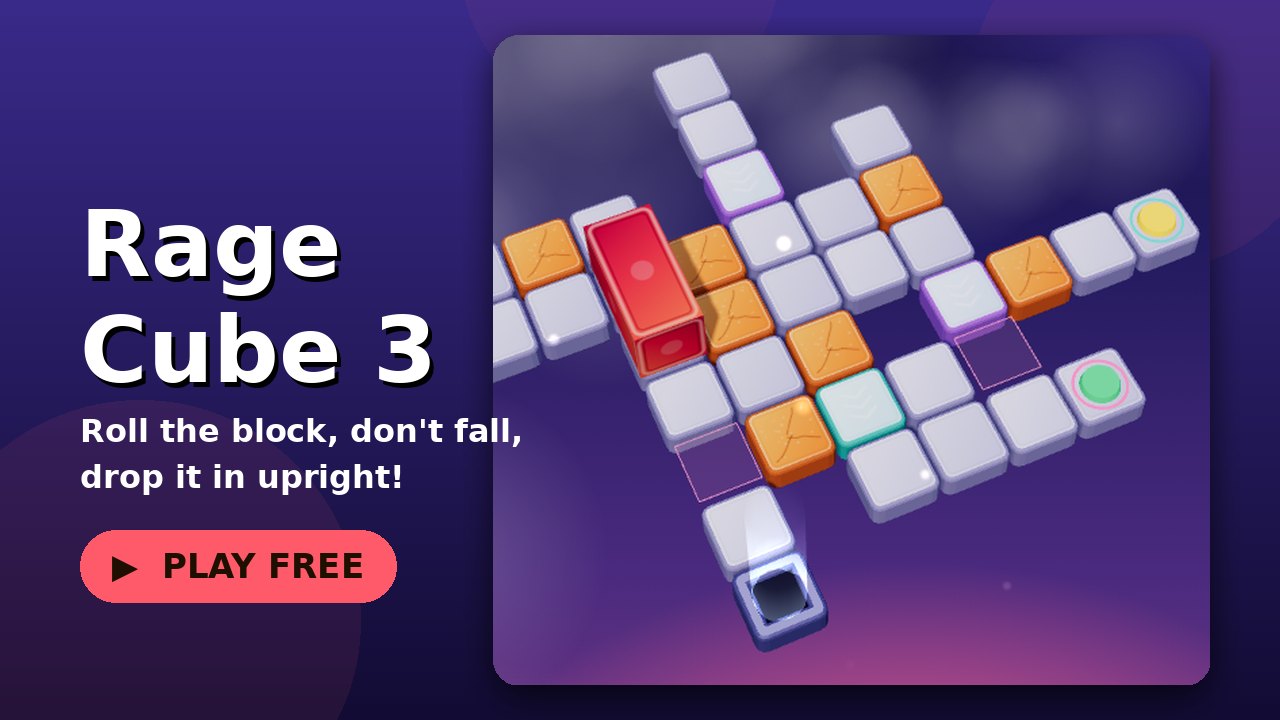
The block's three positions
The block is always in one of three positions:
| Position | Tiles covered | What one move does |
|---|---|---|
| Standing | 1 | Tips over in the direction you push and lies across 2 tiles |
| Lying along the move | 2 | Rolls onto its end and stands up again |
| Lying across the move | 2 | Rolls sideways, stays lying, shifts 1 tile |
The key rule: a standing block travels three tiles in two moves in a straight line (standing → lying → standing). A lying block rolled sideways only shifts one tile per move and never stands up.
Entering the hole upright
The block only falls into the hole when it is standing. A lying block rolls straight over it. So the question for every level is: on the last move the block has to be lying next to the hole, pointing at it. Find that final position first and work backwards.
Fixing your position
Sometimes you reach the right spot in the wrong position. If there is room, a small loop changes how the block sits. Rolling a standing block up, right, down and left brings it back to the same area in a different position. In narrow corridors, look for a 2×2 open area to do this.
Example: solving level 1 together
In level 1 the block starts standing at the top left and the hole is at the bottom right. The minimum is 6 moves.
- Right: the standing block tips over and lies across two tiles.
- Right: it rolls onto its end and stands up. Two moves, three tiles.
- Down and 4. Down: the same rhythm takes you three tiles down.
- Right and 6. Right: the block stands up over the hole and drops in.
The lesson is that the "stand-lie-stand" rhythm jumps three tiles at a time. Later levels add sideways rolls where the target doesn't fit that rhythm.
Tile types
| Tile | What it does | Watch out |
|---|---|---|
| ⬜ Normal | Safe in any position | — |
| 🟧 Fragile | Breaks if the block stands on it, and the block falls | Lying across it is safe |
| ● Round switch | Any part of the block pressing it affects the bridge of its colour | A lying block works too |
| ✕ Heavy switch | Only works when the block stands on it | A lying block can't trigger it |
| 🌉 Bridge | Coloured tiles that switches open and close | A closed bridge is a gap |
| 🔷 Splitter | Standing on it splits the block into two cubes and teleports them | Only the joined block can use the hole |
The switch colour tells you what it does: yellow toggles the bridge, green only opens it and red only closes it. A yellow switch changes the bridge every time it is pressed, so crossing it a second time closes the bridge you just opened.
Split cubes
Standing on a splitter breaks the block into two small cubes. Press Space on a keyboard, or the on-screen button on a phone, to switch between them. Bring them side by side and they join again. The small cubes are light enough to stand on fragile tiles, but they can't trigger heavy switches or enter the hole on their own.
The first 20 levels: what each one teaches
The table lists each level's minimum move count and the idea that cracks it. There are no move sequences here; working them out yourself makes later levels much easier.
| Level | Min. moves | Teaches | Tip |
|---|---|---|---|
| 1 First Steps | 6 | The stand-lie-stand rhythm | Two moves cover three tiles in any direction |
| 2 Winding Path | 8 | Changing direction | Make sure you are standing before the last bend |
| 3 Narrow Pass | 14 | Fixing your position | Use a small loop to change how the block sits |
| 4 Fragile Ground | 14 | Fragile tiles | Enter the orange area lying across your path and roll sideways |
| 5 First Bridge | 10 | Round switches | After opening the bridge, line up the position you need to cross it |
| 6 Zigzag | 18 | Long corridors | Decide which side you will approach the hole from first |
| 7 Cracked Stones | 18 | Scattered fragile tiles | Be lying on every move that lands on orange |
| 8 Hidden Passage | 20 | Toggle switches | Cross the switch twice and the bridge closes again |
| 9 Heavy Switch | 10 | Heavy switches | Approach the ✕ lying from two tiles away and stand up on it |
| 10 Maze | 24 | Long-range planning | Work backwards from the hole |
| 11 Thin Ice | 24 | Fragile tiles near the hole | Mind the orange around the hole; your last move is a stand-up |
| 12 Centre of Gravity | 24 | Heavy switch and bridge | The switch sits on the edge; find the angle that lets you stand on it |
| 13 Orange Danger | 26 | Fragile tiles + switch | Reach the switch without standing on orange |
| 14 Open and Close | 26 | Opening and closing switches | The ✕ switch closes the bridge; don't stand on it after opening |
| 15 Cloud Road | 30 | Managing position | No special tiles; check your position at every corner |
| 16 Two Bridges | 30 | Two bridge groups | Read from the colours which switch controls which bridge |
| 17 Broken Path | 30 | Lots of fragile tiles | Plan the route by where you will be standing |
| 18 Pressure | 32 | Heavy and round switches | Open the first bridge with the heavy switch |
| 19 Order Matters | 32 | Switch order | Don't press the closing switch after the opening one |
| 20 Split in Two | 18 | Splitter tiles | Park one cube and bring the other to it |
Stars, points and help
Every level has a move counter. Finish in the minimum number of moves for ★★★, within 50% more for ★★ and anything else for ★. Clearing a level for the first time earns 2 to 6 points depending on its difficulty (+1 every 10 levels), and every new star is worth +1.
Stuck? Tap 💡 and watch a short ad: the solver shows the next 5 correct moves from where you are. Fall 8 times in a level and you can watch an ad to count it as cleared without stars. There is no timer; Z undoes your last move and R restarts the level.
Common mistakes
- Arriving at the hole lying down. A lying block won't drop; plan the last two moves.
- Standing on a fragile tile. The move that lands on orange must not be a stand-up.
- Pressing a yellow switch twice. The bridge closes and you have to go back.
- Lying on a heavy switch. ✕ only works with a standing block.
- Trial and error. Thinking backwards from the hole beats hundreds of random tries.
FAQ
How many levels are there?
There are currently 45 levels, each checked by a computer solver (breadth-first search) to make sure it can be solved.
What are the controls?
Arrow keys or WASD on a computer; swipe or use the four arrow buttons on a phone. Directions always follow the screen.
How is it different from Rage Cube 2?
Rage Cube 3 is a calm rolling puzzle. Rage Cube 2 is a reflex platformer full of traps; our Turkish guide Sinir Küpü 2 covers it. For another calm puzzle, read our Block Puzzle guide.
#sinir küpü 3#sinir küpü çözüm#blok yuvarlama#bloxorz benzeri#zeka oyunu
Related guides
 🧩 Puzzle & Brain
Daily Puzzle: tips for the longest word and the target number
How to find long Turkish words with suffixes, when the joker gains or loses points, systematic ways to hit the target number and the Daily Puzzle scoring table.
 🧩 Puzzle & Brain
Block Puzzle high score guide: combos, rotate and swap
How Block Puzzle scoring works, exactly when your combo breaks, how often each piece appears and how to get the most out of your 12 rotates and 3 swaps.
 📚 Learning
Turkey's 81 provinces and plate codes: easy ways to learn them and a Turkey Map Master guide
The logic of Turkish plate codes (01-67 alphabetical, 68-81 by creation date), all 81 provinces by region, memory techniques that stick and the Turkey Map Master modes.